Showing posts with label Sewing. Show all posts

Friday, March 28, 2014

Teapot (Head) Under Here

I think he's found his look!

That's my good friend D. I think the look suits him to a "tea"!  I love that he wore this and owned it, and not for a few seconds, either.  For a good long while!  

The tea cosy itself is a project that's been half finished for over a year.  I'm so glad that I can add it to the "done" list.  Every time I look at it, I smile.  I love the whimsy.  The idea came from Bend the Rules Sewing by Amy Karol.  It's linen fabric with a vibrant turquoise flannel lining inside.  I sandwiched thermal batting in the middle.  The bias tape binding on the bottom was made by sewing goddess CO Tea Lover. I really love how the tea cosy turned out, and especially how it's worn!

Billy Connolly — "Never trust a man who, when left alone in a room with a tea cozy, doesn't try it on."

Wednesday, January 23, 2013

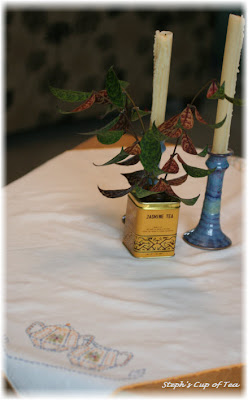
Vintage Embroidered Tea Tablecloth


I received this vintage embroidered tea tablecloth as a Christmas gift.  I love it!  There is a vignette on each corner, with crocheted-edge lacing all around. 

I enjoy thinking of the woman (I assume) who did the beautiful needlework.  Did she make this for use in her home or as a gift?  What drew her to these colors?  How long did it take her to complete?  Did she ever prick her finger?  My questions go on and on...what a story I can imagine!
   
It was very fun to find things I owned to accent the tablecloth.  It became a table setting full of memories.  I pulled out a tea tin that the DH and I had purchased (full of jasmine tea) on our honeymoon in San Francisco.  :-)  The candlesticks are from a potter in New Mexico. 

Sunday, December 30, 2012

Fabulous Fabric Rings


I've been making these fabulous fabric rings for gifts (and a few for myself!).  Thanks to the tutorial from V & Company.  I found the ring bases at JoAnn's and used fabric from my stash.  The ring takes only a 1" by 10" strip.  I enjoyed matching the colors of the rings to the personalities of my friends.

My suggestions:  Dedicate the first ring to getting the process figured out, and the rest will be fun and fast!  I also recommend (on the final step) applying pressure to hold the ring base and fabric together so that they have a wide base of adhesion.  

I experimented with different shapes.  The ring below is one of my favorites.  :-) 

Wednesday, June 20, 2012

Tea Fabric Summer Blouse


I've had this teapot fabric for several years, and didn't know what to do with it.  I finally decided on making this blouse, from the Made by Rae tutorialI like the blousy look, above, but also thought it would look nice with a contrasting sash. 

Which do you prefer?


Friday, April 06, 2012

Butterfly Teapot Holder

I've been making these butterfly teapot holders (pattern from Marmalady).  I love the opportunity to mix and match fabric and bias tape choices, and I've learned a lot about sewing bias tape on curves.

The butterflies have heat-resistant batting in the center.  Slip your fingers into the wing pockets to grasp the teapot handle.  These are so cute!

Wednesday, December 28, 2011

A Surprise Visit and Teacup Aprons

Happy "in between"!  That's what I call this time between Christmas and New Year's.  I hope you have time for slowness, reflection and rest. 

I spent a very nice Christmas with family.  A special highlight was the surprise visit from dear friends who live a good drive away!  Timing played out so that I wasn't going to be able to visit them this year.  Unknown to me, they had planned with my sister to come and see me instead!  Oh, what a wonderful gift!  They even brought lunch with them.  Thank you from the depths of my heart!

These friends are very creative people.  We celebrated with Esme the publication of her prize-winning fiction story.  And Sweetcakes, crafter extraordinaire, gave us these lovely, whimsical aprons.  Mine is a fashion statement to be worn with a skirt!  I can promise it will never see the likes of a kitchen mess.
My Teacup Apron
And matching ones for my sister and her little one, too

I'm very, very grateful to all of my friends and family who remain constant in my life, despite the miles and distance between us.  Much love!

Friday, December 16, 2011

New Tea Thermos, New Scarf

I got a new tea thermos, one made by Thermos, ha ha.  It's the 12-oz Nissan with two lids, one for brewing tea and one for drinking.  I like it!  (Let me also say that I love this Livestrong thermos, too.) 

The way the tea brewing works in the Nissan is like this:
1 - Preheat thermos.
2 - Add fresh hot water to the fill line.
3 - Add desired amount of tea to the infuser basket and screw in.
4 - Screw on the top lid.
5 - Turn upside down and brew.  (Yep, upside down!)
6 - When done, turn right side up, remove infuser basket and screw in drinking lid.  Add top lid, and off you go.

Here's a close-up of the infuser basket with a couple of tea leaves stuck inside.  ;-)  I'm quite pleased with the thermos.  I like that it's only 12 ounces - it fits well inside my backpack.  The top lid also keeps things dry, so I don't have to worry about liquid leaks. 


Unrelated, other than it's new...my new scarf.  I made it from this tutorial, and I really love it! 
 Wear it doubled up like this...

Or long like this. 

I also made a purple/grey one out of lighter-weight knit fabric.  It's amazing how the weight of the fabric makes such a difference!  It's a very different scarf, but I love it too.

The first one takes a few minutes to figure out, the braiding and the tubular sewing of the seams.  The tutorial writer does a great job of walking you through the steps, even including a video.  After the first one, these become super-easy to make!  I can think of many variations and fun ways to try it out.

Happy weekend!

Friday, October 07, 2011

Green Tea Dress/Scarf

My "Green Tea" Minidress and Scarf

This is my "green tea" outfit!  Brought to me by my fashion-forward friends!  This outfit has a story...

Part One:  While in India at the Glenburn Tea Estate, my room friend MJ comes to the room with this AMAZING scarf!  It's a silk/cotton blend, it hangs so lovely, it's got a great hand feel, it's got the tea leaf/flower on it, it's perfect! 

Camellia Sinensis leaf and flower

I didn't buy one.  Why? I don't know.  Sometimes I get that way.  I was admiring MJ's scarf for the next few days, wishing I had indulged.  You can imagine my delight when, a few days later, MJ handed me this scarf she had tucked away as a gift.  SO thoughtful!

Part Two:  I arrive home from China/India, weary and bleary.  On the table to welcome me is a package from CO Tea Lover.  Inside is this fantastic silk mini-dress.  My friend found it in the Halloween section at a local thrift store!  It's handmade, silk, lined with a lovely contrast fabric, and fits great!  Of course, the best part is that it's a perfect match for the scarf.  My green tea outfit, meant to be.  Thank you to MJ and CO Tea Lover!

Sunday, April 24, 2011

New Spring Dress

My new spring dress

My friend CO Tea Lover gave me this great pattern for Christmas, and encouraged me to up my sewing game.  With the promise of a sew-along, I agreed to give this a try even tho I thought this pattern was a step up from my routine.  I think maybe that was the point.  ;-)

CO Tea Lover helped me cut out the pattern and fit check it to my body.  We agreed a trial run might be a good idea, and I found some inexpensive fabric at JoAnn's.  Delightfully, it turned out to be wearable!  :-)  I'm really happy with the new dress.  I look forward to making another version.

Yesterday was one of those heavenly spring days - sunny, warm and meant for spending time outside.  Here I am, sipping blood orange mimosas (more on that in a future post) with a friend at her yard sale.

Photo by Mitra

The dress pattern, called The Torii Tunic, is by Serendipity Studio.  I found the pattern to be easy to understand and unfussy to sew. I was a bit perplexed when I noticed that the front and back of the sleeves did not match - one was wider than the other. This required a phone consultation from CO Tea Lover, who explained it's a normal method to help the sleeves hang properly.  The rest of the sewing flowed smoothly, despite many new techniques such as neckline and waist contrast and facings.  I would definitely try another pattern from Serendipity Studio.

Do you have any spring projects in the works?  What are you sewing?  Crafting?  Writing?  Thinking about creating?  I've got one more big one in the works...we're moving!  Only about 1/4 mile away, but it's still a lot of work! 

Yay for spring!

Tuesday, November 30, 2010

A Warm and Snuggly Teapot Sweater


Do you know the magazine Ready Made?  They also have a cool blog.  I love it!  I can check the magazine out from the library and it has the coolest projects.  I saw this idea recently, to repurpose a sweater into a tea cozy.  It was fun and easy (just scissors and hand stitching).  And it works!

Sunday, November 07, 2010

Book review: Sew Retro

I've thoroughly enjoyed learning about the history of sewing (and, in parallel, a look at feminism and gender roles) in the new book Sew Retro, by Judi Ketteler.  http://www.sewretrothebook.com/

I was inspired by the profile of Ellen Curtis Demorest, who made paper patterns accessible to the home seamstress.  Among many enterprises, she ran a magazine that encouraged positive messages for women.  It encouraged them to seek employment, apply to college, and applaude the successes of their women peers.  She provided jobs for women in her shops throughout the country, including hiring African-American women who received the same benefits as white women. 

If you're interested in fashion, sewing, and/or women's history, this book is a fun and informative read.  (Your library probably has it, if you're willing to wait in line.)  The book also provides sewing projects for the modern woman, inspired by the past.

Sunday, September 19, 2010

Dye Job

Inspired by this Martha Stewart article, I spent part of a recent Saturday dip-dying anything I could get my hands on including plain white stationery and this linen fabric.  After dyeing, I tore the linen into the width I wanted and sewed a boundary line about 1/4 inch from the edge.  Then I frayed the edges, as shown below.  I love it!  (And I had enough extra linen from the yard I had purchased to make a wrap in the same style.)
While I was at it, I also dip-dyed  this plain white cotton knit shirt.

The dip-dying is easy.  The hard part is not making a mess.  I used a dish pan in my bathtub, and set up the clothes drying rack right next to it (with lots of newspaper underneath).  When it was time to rinse the fabric, I transferred into a stainless steel bowl, then to my stainless kitchen sink.  System worked pretty well.  Follow Martha's tips, and those on the package.  I used 1/2 a package of Rit powder dye (Royal blue) for all of these things and had lots left.

To get the gradations of color, I simply did a double-dip.  This project would be great for a crafty tween.  Oh, and since I did have to sew the boundary line, I'll count this as a sewing project for the September sewing month.  ;-)

Wednesday, September 08, 2010

Reusable Snack Bags


Sweetcakes made these reusable snack/sandwich bags to match my new lunch bag.  They are lined with ripstop nylon and they close with Velcro.  Pretty cool, huh?  See her post on the topic for more info.

PS - Sept is National Sewing Month.  This is a great project in case you needed one.  ;-)

Tuesday, August 24, 2010

A New Lunch Bag


Even though I'm no longer living in a college town, fall seems like a new start to me.  I've had fun donating school supplies to a local drive.  And I wanted (and needed) a new lunch bag.  I whipped this one up from a pattern in this book.  I love the way it works and the size. You can see below that I was able to carry a sandwich, cheese stick, yogurt and container of granola.

The way the bag works is cool - the handles allow you to tie it off and secure everything snugly.  This works great for my bike commute. 

Now for those of you with a focus on details, you might notice my raw edges are showing.  I messed up.  Nonetheless, it works fine!


Thursday, June 17, 2010

Sewing Inspiration


Sew, Mama, Sew is having a Make It, Wear It theme this month.  It includes lots of useful tips and tricks, perfect for where I am in my sewing experience.  I'm starting to get excited about it, as I've just unpacked the sewing machine!  Now, if I could just find the thread...

Friday, May 14, 2010

T-shirt Redo #2

One of my favorite T-shirts just got a makeover! I dig the message of this shirt, but I seldom wore it. You can see why.


  Here's the new version - much better!

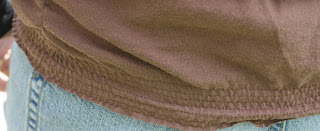
I found inspiration from this blog post.  I didn't want the ruffles, but I used the idea of shirring the bottom and making scalloped sleeves.  I used elastic thread in my bobbin for the shirring and scalloping.  I wanted a flat neckline, so I simply cut out the ribbed band.  I took in the sides about 5/8 on each side, and also used the elastic thread to give it a wee bit of gathering.  Voila - from boxy to fun!


And the best part:


I got the T-shirt a couple of years ago when I went to see (and was totally blown away by) the Vagina Monologues.

See T-shirt Redo #1.  And see my other adventure into sewing with elastic thread.

Monday, May 03, 2010

Sewing for Someone Aged 2.7

My niece and her Mom and Grandma visited recently.  It was a fun-filled, busy weekend!  I'm not used to that 2.7-year-old energy; it's consuming and I'm in deep respect of my sister!  That energy is so pure and bubbly and honest.  I love it.  

I was excited to have her wear two things I made for her recently.  I love the colors and style of this cute little sundress.  It's an easy-to-sew piece and is perfect for a growing girl, as it continues to work as she grows.  Both the dress and contrasting bow are recycled tablecloths I'd made previously. Thanks to Habitual for the pattern!


And here's my little kitchen helper in her new apron.  Tutorial here (with thanks!).


Fabric from Hobby Lobby. 


We had tea parties and ate pizza. We went for walks.  We picked flowers and squashed bugs.  We collected pine cones.  We touched everything.  We shared sweet hugs and a few 'this is not going my way!' moments.  We talked about what she would do when she's big (age: 3).  It's inspiring to be with someone so in-the-moment.  The challenge, I think, is for grown-ups to return there ourselves.

Friday, April 09, 2010

A Posy for My Sweater


I love this red sweater.  Yet, I've had it for a looooong time and wanted to do something new with it.  So I added a posy!  I got the idea for free-style machine embroidery this from the book, Bend the Rules with Fabric (at my library!).  I wanted the flower to look whimsical, like a doodle, imperfect like real life. 

I didn't have the book instructions in front of me, so I winged it (a risky proposition with me and sewing, so I'm pleased it worked!).  I recalled that I needed to reinforce the fabric, so I added a bit of light interfacing on the back side.  I drew, with disappearing fabric ink, the general sketch of the flower.  Then I stitched it, round the stem and each petal twice for the doodle look.  I believe Amy Karol calls for using a free-motion technique, but I don't have that sewing equipment.  So, I just went really slowly.  Two stitches, stop with the needle down, lift presser foot and pivot, and so on. 

I think it makes the grade.  The real joy for me is having something fresh without being a consumer!

Friday, March 26, 2010

Shape Shift

Before
This is one of my favorite sweaters. It had, unfortunately, shrunk a little over time and I no longer liked how it hit me at the hips. In fact, it annoyed me greatly. So it was in the pile to go to the thrift store. But..... I couldn't quite part with it. Such a pretty color and nice wool.
Yesterday I had the great idea to turn it into a cardigan. I'm so happy! It was easy, too. I cut it up the middle, added a button at the V-neck point, and put some seam sealer on the raw edges. Voila! I like the cardi even better than the original.

After
You can also see other refashion ideas here.

Monday, February 15, 2010

Totally Smooshable

Look closely at the photo above and you'll see one well-smooshed sock monkey! Pepper, the monkey, is in a state of bliss. Sock monkeys live for smooshings.


Pepper was a Valentine's Day gift for my 2-year-old niece.
Photos by my sister.